


The first open-source Python package for fully automated CT pelvimetry and body composition analysis.
ctpelvimetry turns the manual, ~15-minute-per-scan process of measuring mid-pelvic dimensions and body composition into a fully automated 2-minute pipeline. Built for surgical data science, preoperative risk assessment, and large-scale ML training datasets, it integrates with TotalSegmentator to extract anatomical metrics directly from raw CT scans — eliminating inter-observer variability.
- Quick Start
- Installation
- CLI Usage
- Python API
- Output Structure
- Measured Metrics
- Quality Control
- Hardware Requirements
- Body Composition License (Optional)
- Architecture
- Troubleshooting
- Citation
# Install
pip install "ctpelvimetry[seg]"

# Process a single DICOM folder
ctpelvimetry pelv \
  --dicom_dir /path/to/Patient_001 \
  --patient Patient_001 \
  --output_root ./output

# Or a directory full of NIfTI files (Medical Decathlon, KiTS, etc.)
ctpelvimetry pelv \
  --nifti_root /path/to/niftis \
  --output_root ./output
You get back a CSV with ISD, inlet/outlet AP, sacral metrics, plus QC images. ~2 minutes per scan on a GPU.
# Basic — for analysis when you already have segmentations
pip install ctpelvimetry

# Full — includes TotalSegmentator for end-to-end automation
pip install "ctpelvimetry[seg]"
Requires Python 3.10+.
For body composition (VAT/SAT/muscle), one extra step is required — see Body Composition License. Pelvimetry works without it.
ctpelvimetry ships two subcommands:
| Subcommand | Purpose |
|---|---|
pelv |
Pelvimetry: mid-pelvic dimensions (ISD, inlet/outlet AP, sacrum) |
body-comp |
Body composition: VAT, SAT, skeletal muscle area at L3 and ISD levels |
The pelv subcommand has 5 input modes. Pick the one that matches your data layout:
| Mode | Flags | Use when |
|---|---|---|
| 1. Existing seg | --seg_folder (+ --nifti_path) |
You already have TotalSegmentator output |
| 2. Single DICOM | --dicom_dir + --patient |
One patient's DICOM folder on disk |
| 3. Single NIfTI | --nifti_path + --patient |
One NIfTI file |
| 4. DICOM batch | --dicom_root (+ --start / --end) |
Folder of Patient_001/, Patient_002/, ... |
| 5. NIfTI batch | --nifti_root (+ optional --pattern) |
Folder of *.nii.gz files (one per patient) |
# Mode 1 — analysis only (skip segmentation)
ctpelvimetry pelv \
  --seg_folder /path/to/seg \
  --nifti_path /path/to/ct.nii.gz \
  --patient Patient_001 \
  --output_root ./output

# Mode 2 — single patient, full pipeline from DICOM
ctpelvimetry pelv \
  --dicom_dir /path/to/Patient_001 \
  --patient Patient_001 \
  --output_root ./output

# Mode 3 — single patient, full pipeline from NIfTI
ctpelvimetry pelv \
  --nifti_path /path/to/ct.nii.gz \
  --patient Patient_001 \
  --output_root ./output

# Mode 4 — batch DICOM (expects ./DICOMs/Patient_001/, ./DICOMs/Patient_002/, ...)
ctpelvimetry pelv \
  --dicom_root /path/to/DICOMs \
  --output_root ./output \
  --start 1 --end 250

# Mode 5 — batch NIfTI (expects *.nii.gz directly under nifti_root)
ctpelvimetry pelv \
  --nifti_root /path/to/niftis \
  --output_root ./output

# Custom glob pattern (e.g. uncompressed NIfTI, or non-default naming)
ctpelvimetry pelv \
  --nifti_root /path/to/niftis \
  --pattern "case_*_ct.nii" \
--output_root ./output| Flag | Default | Description |
|---|---|---|
--output_root |
./pelvimetry_output |
Root directory for all outputs |
--output |
combined_pelvimetry_report.csv |
Output CSV filename |
--fast |
off | Use TotalSegmentator --fast mode (faster, slightly less accurate) |
--no-tissue |
off | Skip the body composition (tissue_types) task |
--qc / --no-qc |
on | Generate QC images |
Run ctpelvimetry pelv --help for the full list.
Computes VAT, SAT, and skeletal muscle area at the L3 and mid-ISD levels. Requires pelvimetry to have already run (so it knows where the ISD level is).
# Single patient
ctpelvimetry body-comp \
  --patient Patient_001 \
  --seg_root ./output/Segmentation \
  --nifti_root ./output/NIfTI \
  --pelvimetry_csv ./output/combined_pelvimetry_report.csv \
  --output ./output/body_comp_001.csv \
  --qc

# Batch
ctpelvimetry body-comp \
  --seg_root ./output/Segmentation \
  --nifti_root ./output/NIfTI \
  --pelvimetry_csv ./output/combined_pelvimetry_report.csv \
  --output ./output/body_composition_report.csv \
  --start 1 --end 250 \
  --qc_root ./output/body_comp_qc
Run ctpelvimetry body-comp --help for all flags.
For custom pipelines or integration into existing data-science workflows.
| Function | Use case |
|---|---|
run_combined_pelvimetry |
Existing segmentation → measurements |
run_full_pipeline |
DICOM folder → NIfTI → seg → measurements (one patient) |
run_nifti_pipeline |
NIfTI file → seg → measurements (one patient) |
run_pelvimetry_batch |
DICOM batch (parent dir of Patient_xxx/ folders) |
run_pelvimetry_nifti_batch |
NIfTI batch (directory of *.nii.gz) |
process_single_patient |
Body composition for one patient |
PelvicConfig |
Tuneable detection thresholds |
from ctpelvimetry import (
    run_combined_pelvimetry,
    run_full_pipeline,
    run_nifti_pipeline,
)

# A. Already have segmentation (fastest path; just measurement + QC)
result = run_combined_pelvimetry(
    patient_id="Patient_001",
    seg_folder="/path/to/segmentation_masks",
    nifti_path="/path/to/ct.nii.gz",
    qc_dir="./output/QC",  # optional
)
print(f"ISD: {result['ISD_mm']} mm")
print(f"Inlet AP: {result['Inlet_AP_mm']} mm")

# B. From a DICOM folder (end-to-end)
result = run_full_pipeline(
    patient_id="Patient_001",
    dicom_path="/path/to/Patient_001",
    output_root="./output",
    use_fast=False,      # set True for quick previews
    skip_tissue=False,   # set True to skip body comp
)

# C. From a NIfTI file (end-to-end, skips DICOM conversion)
result = run_nifti_pipeline(
    patient_id="Patient_001",
    nifti_path="/path/to/ct.nii.gz",
    output_root="./output",
)from ctpelvimetry.batch import (
run_pelvimetry_batch,
run_pelvimetry_nifti_batch,
)
# DICOM batch — expects /data/DICOMs/Patient_001/, /data/DICOMs/Patient_002/, ...
df = run_pelvimetry_batch(
dicom_root="/data/DICOMs",
output_root="./output",
output_csv="./output/results.csv",
start=1, end=250,
)
# NIfTI batch — expects /data/niftis/case_001.nii.gz, case_002.nii.gz, ...
df = run_pelvimetry_nifti_batch(
nifti_root="/data/niftis",
output_root="./output",
output_csv="./output/results.csv",
pattern="*.nii.gz", # default
use_fast=False,
skip_tissue=False,
)
# Filter to fully successful patients
success = df[df["Status"] == "Success"]
print(success[["Patient_ID", "ISD_mm", "Inlet_AP_mm"]].describe())Both batch functions return a pandas.DataFrame and write a CSV to output_csv. Per-patient errors are isolated — one failure won't abort the run.
from ctpelvimetry import process_single_patient

body_comp = process_single_patient(
    patient_id="Patient_001",
    seg_root="./output/Segmentation",
    nifti_path="./output/NIfTI/Patient_001/Patient_001.nii.gz",
    pelvimetry_csv="./output/combined_pelvimetry_report.csv",
    qc_dir="./output/body_comp_qc",  # optional
)
print(f"VAT @ L3: {body_comp['L3_VAT_cm2']} cm²")
print(f"V/S ratio @ L3: {body_comp['L3_VS_ratio']}")
print(f"SMA @ L3: {body_comp['L3_SMA_cm2']} cm²")from ctpelvimetry import run_combined_pelvimetry, PelvicConfig
config = PelvicConfig(
rotation_warn_deg=3.0, # tighter QA than the default 5°
tilt_warn_deg=3.0,
sacrum_offset_warn_mm=3.0,
)
result = run_combined_pelvimetry(
patient_id="P001",
seg_folder="./seg",
nifti_path="./ct.nii.gz",
config=config,
)After running the pelvimetry pipeline, --output_root looks like:
output/
├── NIfTI/                       # DICOM → NIfTI conversions (DICOM modes only)
│   └── Patient_001/
│       └── Patient_001.nii.gz
├── Segmentation/                # TotalSegmentator masks
│   └── Patient_001/
│       ├── hip_left.nii.gz
│       ├── hip_right.nii.gz
│       ├── sacrum.nii.gz
│       ├── femur_left.nii.gz
│       ├── femur_right.nii.gz
│       ├── vertebrae_S1.nii.gz
│       ├── ...
│       ├── subcutaneous_fat.nii.gz   # only with TOTALSEG_LICENSE_KEY
│       ├── torso_fat.nii.gz
│       └── skeletal_muscle.nii.gz
├── QC/                          # Visual QC images (PNG)
│   ├── Patient_001_Sagittal_QC.png
│   └── Patient_001_Extended_QC.png
└── combined_pelvimetry_report.csv   # The aggregated results
| Column | Type | Description |
|---|---|---|
Patient_ID |
str | Patient identifier |
Status |
str | Success, Partial_N/6, Failure, or Error |
Error_Log |
str | Per-metric error codes (semicolon-separated), if any |
ISD_mm |
float | Inter-Spinous Distance |
Inlet_AP_mm |
float | Pelvic inlet AP diameter |
Outlet_AP_mm |
float | Pelvic outlet AP diameter |
Outlet_Transverse_mm |
float | Intertuberous diameter |
Sacral_Length_mm |
float | Sacral length (promontory → coccygeal apex) |
Sacral_Depth_mm |
float | Maximum sacral concavity depth |
Pelvic_Rotation_deg |
float | Axial rotation (quality flag) |
Pelvic_Tilt_deg |
float | Coronal tilt (quality flag) |
Promontory_x/y/z |
float | RAS world coordinates (mm) of detected landmarks |
Upper_Symphysis_x/y/z |
float | (and similar columns for all detected landmarks) |
CT_NIfTI, Seg_* |
str | File paths to inputs/intermediates for traceability |
Status semantics:
Success— all 6 pelvimetric metrics computedPartial_N/6— N of 6 metrics computed; the rest inError_LogFailure— 0 metrics computed (segmentation produced but unusable)Fail_NIfTI— DICOM → NIfTI conversion failed (DICOM modes only)Fail_Seg— TotalSegmentator failed to produce required masksFail_NIfTI_Missing— input NIfTI file does not exist (NIfTI modes only)Error— uncaught exception during processing (batch mode only); full message inError_Message
| Metric | Description |
|---|---|
| ISD (mm) | Inter-Spinous Distance — narrowest mid-pelvic width, critical for deep pelvic dissection |
| Inlet AP (mm) | Promontory → upper symphysis distance |
| Outlet AP (mm) | Coccygeal apex → lower symphysis distance |
| Outlet Transverse (mm) | Intertuberous diameter (between ischial tuberosities) |
| Sacral Length (mm) | Promontory → coccygeal apex along the sacral curve |
| Sacral Depth (mm) | Maximum concavity depth from the inlet-outlet chord |
| Metric | Description |
|---|---|
| VAT / SAT (cm²) | Visceral / subcutaneous adipose tissue area |
| V/S Ratio | VAT / SAT ratio — indicator of visceral obesity |
| SMA (cm²) | Skeletal Muscle Area at L3 and mid-pelvis levels |
ctpelvimetry generates two QC panels per scan so you can spot-check landmark detection visually before trusting the numbers.
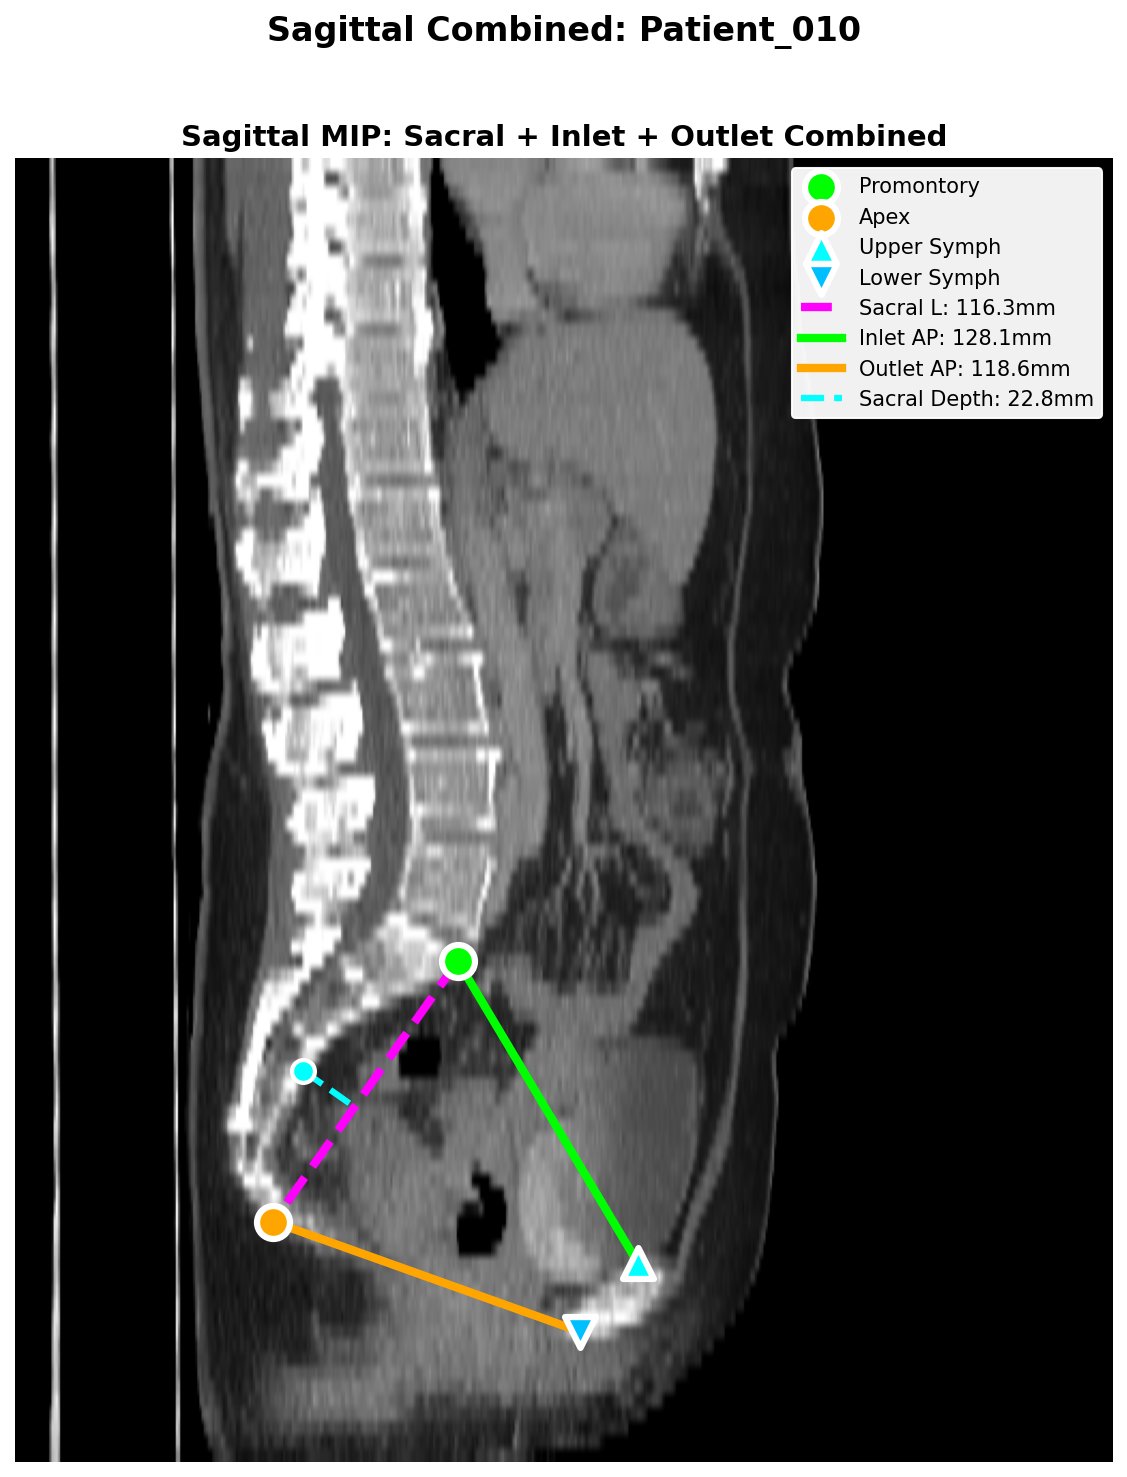 Sagittal QC: sacral length (magenta), inlet AP (green), outlet AP (orange), sacral depth (cyan).
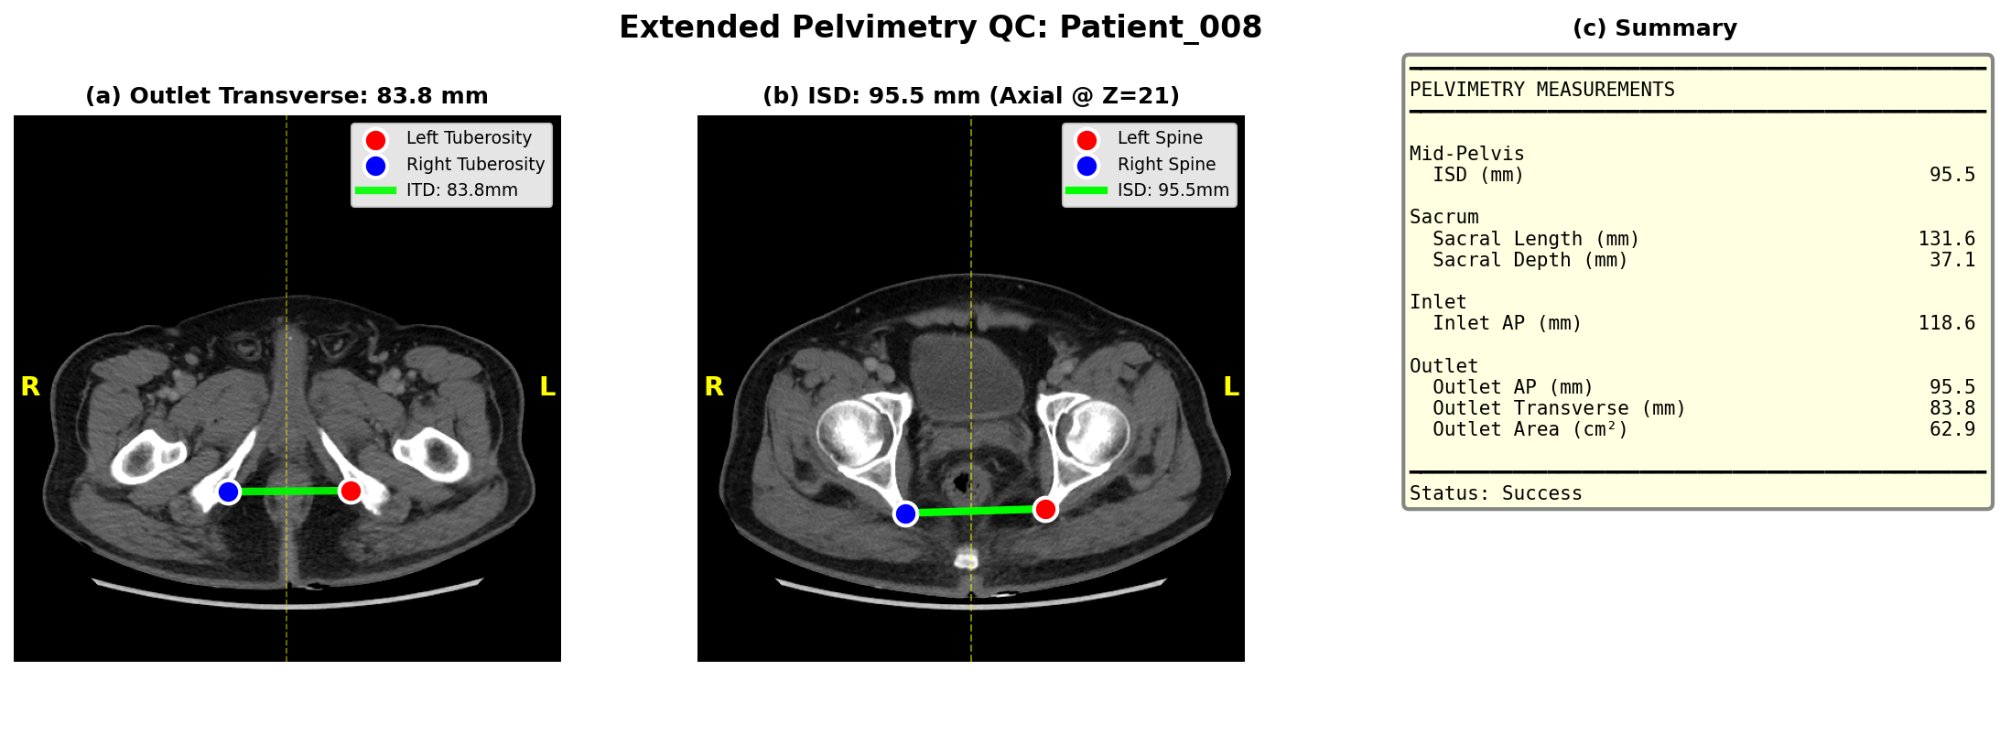 Extended QC: outlet transverse diameter, ISD, and tabular measurement summary.
The pipeline also writes quality flags to the CSV:
Pelvic_Rotation_Flag/Pelvic_Tilt_Flag—ok,warn,high(axial rotation and coronal tilt of the patient on the table)Sacrum_Offset_Flag— sacrum-to-symphysis midline offset in mm
These flags don't block measurement but signal when manual review is wise.
End-to-end automation runs deep-learning segmentation. A GPU is strongly recommended.
| Setup | Time per scan | Notes |
|---|---|---|
| NVIDIA GPU 8GB+ VRAM (T4, RTX 3060+, A100) | < 2 min | Recommended. 16GB+ for high-res CTs. |
| CPU only | 10–30+ min | Will work but slow; may OOM on large series |
| Google Colab (free T4) | < 2 min | Easy cloud option for clinical researchers |
If you only run analysis on pre-existing segmentations (Mode 1), a standard CPU is fine — no GPU needed.
Body composition (VAT/SAT/muscle) requires TotalSegmentator's tissue_types task, which needs a free academic license. Pelvimetry works without it.
# 1. Register (free, takes 30 seconds): https://backend.totalsegmentator.com/license-academic/
# 2. Set the env var (add to ~/.bashrc or ~/.zshrc to persist):
export TOTALSEG_LICENSE_KEY=aca_xxxxxxxxxxxx
If TOTALSEG_LICENSE_KEY is unset, the pipeline silently skips body composition and reports pelvimetry only. No errors, no warnings beyond a one-line info message.
Note: Versions ≤ 1.4.1 shipped with a hard-coded license key. That key has been removed (see CHANGELOG); please register your own.
ctpelvimetry/
├── cli.py               # Unified CLI entry point (pelv + body-comp subcommands)
├── pipeline.py          # End-to-end orchestration:
│                        #   - run_combined_pelvimetry  (seg → measurements)
│                        #   - run_full_pipeline         (DICOM → measurements)
│                        #   - run_nifti_pipeline        (NIfTI → measurements)
├── batch.py             # Batch processors with per-patient error isolation:
│                        #   - run_pelvimetry_batch
│                        #   - run_pelvimetry_nifti_batch
│                        #   - run_body_composition_batch
├── conversion.py        # DICOM → NIfTI conversion
├── segmentation.py      # TotalSegmentator integration wrapper
├── landmarks.py         # 3D geometric landmark detection
├── metrics.py           # Pelvimetric calculations (ISD, AP, sacral, etc.)
├── body_composition.py  # Fat / muscle area quantification
├── qc.py                # QC image generation (matplotlib)
├── io.py                # Mask I/O with canonical (RAS) reorientation
└── config.py            # PelvicConfig dataclass: tuneable thresholds
TotalSegmentator didn't produce hip masks. Usually the CT FOV doesn't include the pelvis, or the scan is corrupted. Inspect the input NIfTI in a viewer (3D Slicer, ITK-SNAP).
You're trying to run body composition without a license. Either set TOTALSEG_LICENSE_KEY (see Body Composition License) or pass --no-tissue to skip explicitly.
Either you don't have a GPU or PyTorch isn't seeing it. Verify with:
import torch; print(torch.cuda.is_available())If False, reinstall PyTorch with the CUDA build for your driver.
Promontory or coccygeal apex wasn't detected. The other 5 metrics are still valid. Check the Sagittal QC PNG.
Patient is probably rotated or tilted on the table. Check Pelvic_Rotation_deg and Pelvic_Tilt_deg columns — the pipeline flags values > 5° (default) as warn, and these often indicate unreliable measurement. Tighten the thresholds via PelvicConfig if you want stricter automatic flagging.
You're probably reading a body-composition CSV (different schema). Pelvimetry results are in combined_pelvimetry_report.csv.
PRs welcome from both the surgical and data-science communities. The package follows semantic versioning; tag pushes (v*) auto-trigger PyPI publishing via GitHub Actions.
git checkout -b feature/your-feature
# ... make changes, add tests in tests/
pytest                            # all should pass
git commit -am "feat: ..."
git push origin feature/your-feature
# Open a PRIf ctpelvimetry enables your research, please cite:
@software{huang2026ctpelvimetry,
  author    = {Huang, Shih-Feng},
  title     = {ctpelvimetry: Automated CT Pelvimetry and Body Composition Analysis},
  year      = {2026},
  url       = {https://github.com/odafeng/ctpelvimetry},
  version   = {1.6.0},
}
A peer-reviewed manuscript on the clinical validation of this pipeline is in preparation.
License: Apache License 2.0 | Author: Shih-Feng Huang, MD (@odafeng)