Welcome to the Git and GitHub Guide repository! This guide provides a comprehensive introduction to both Git and GitHub—from fundamental concepts and everyday commands to advanced workflows and collaboration techniques.
- Introduction to Git
- Getting Started
- Basic Git Commands
- Branching and Merging
- Collaborating on GitHub
- Advanced Topics
- Resources
- Contributing
- License
Git is a distributed version control system that helps you track changes to your codebase over time. It allows multiple developers to work on the same project simultaneously, keeping a history of changes and enabling efficient collaboration. Whether you're working on personal projects or large-scale software development, understanding Git is crucial for maintaining code quality and managing teamwork.
If you're new to Git and GitHub, this guide will walk you through the initial setup and configuration steps.
- Download Git: Depending on your operating system, you can download Git from the official website.
- Install Git: Run the installer and follow the on-screen instructions.
After installing Git, set your identity—this information will be associated with your commits.
- Open Terminal (Linux/macOS) or Git Bash (Windows).
- Set your name:
git config --global user.name "Your Name" - Set your email:
git config --global user.email "[email protected]"
- Choose a directory:
cdinto the folder where you want the repository. - Initialize a repository:
git init
- Peek inside the
.gitfolder:Git stores all tracking information in the hiddenls -a
.gitdirectory. - Check the status:
git status
- Add files to the staging area:
git add .                 # stage all changes
git add <file-name>       # stage a single file
- Commit your changes:
git commit -m "Initial commit"
- Log in to GitHub and click the + sign → New repository.
- Give it a name, skip adding a README,
.gitignore, or license for now, then click Create repository.
- Generate a new SSH key pair:
ssh-keygen -t rsa -b 4096 -C "[email protected]" - Press
Enterto accept the default location (or choose a secure passphrase). - Display your public key:
cat ~/.ssh/id_rsa.pub - Copy the output and add it to GitHub under Settings → SSH and GPG keys → New SSH key.
- Add the remote repository using the SSH URL:
git remote add origin [email protected]:username/repository.git
git branch -M main
- Push your local commits:
git push origin main
- Copy the repository’s HTTPS or SSH URL from GitHub.
- Run:
This downloads the entire repository into a new folder.
git clone <repository-url>
The -s (or --short) flag gives a compact, machine‑readable output.
Left column = staging area status, right column = working tree status.
?? = untracked, M = modified, A = added, etc.
$ git status -s
 M README.md        # modified in working tree, not staged
A  script.py        # added to staging area
?? notes.txt        # untracked
Stage changes to prepare them for a commit:
git add file.txt          # stage a file
git add .                 # stage everything in the current directory
Unstage a file (remove it from the staging area but keep the changes in the working directory):
git reset HEAD file.txt   # unstage
# or, with the newer syntax
git restore --staged file.txt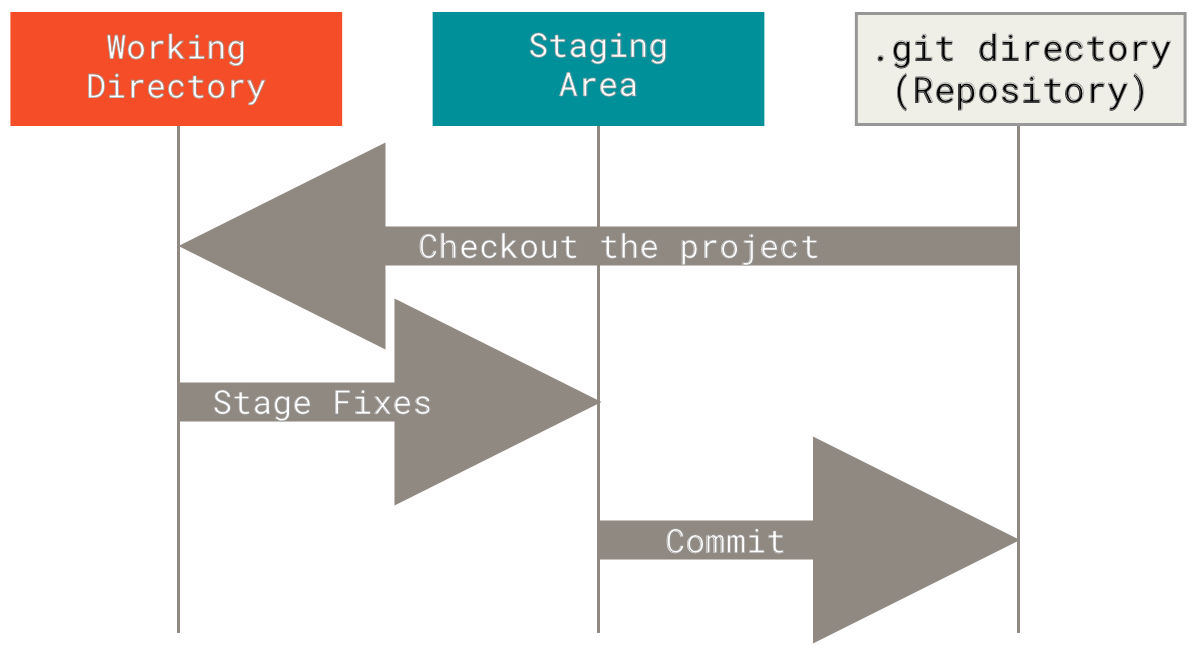
View your commit history in a compact, visual graph.
git log --oneline --graphExample output:
* 3a2b1c0 (HEAD -> main) Fix login bug
* 7d8e9f0 Add user authentication
* 1f2a3b4 Initial commit
With branches:
* 5c6d7e8 (feature) Add search bar
| * 4b5a6c7 (main) Update README
|/
* 3a2b1c0 Base project

git blame shows who last modified each line of a file, the commit hash, and the date.
git blame filename.extExample:
^1a2b3c4 (Alice 2024-01-15 10:20:30 +0100  1) # Project setup
2d3e4f5g (Bob   2024-02-01 14:55:00 +0100  2) print("Hello, World!")
Use it to quickly find the author of a bug or understand why a line was introduced. Many IDEs also provide a visual “blame” annotation.

- Create and switch to a new branch:
Or with the newer
git checkout -b new-feature
switchcommand:git switch -c new-feature
- List branches:
git branch          # local branches
git branch -a       # local + remote
- Switch between branches:
git checkout main
git switch main
- Delete a branch after merging (locally):
To delete a remote branch:
git branch -d new-feature      # safe delete – only if merged
git branch -D new-feature      # force delete
git push origin --delete new-feature
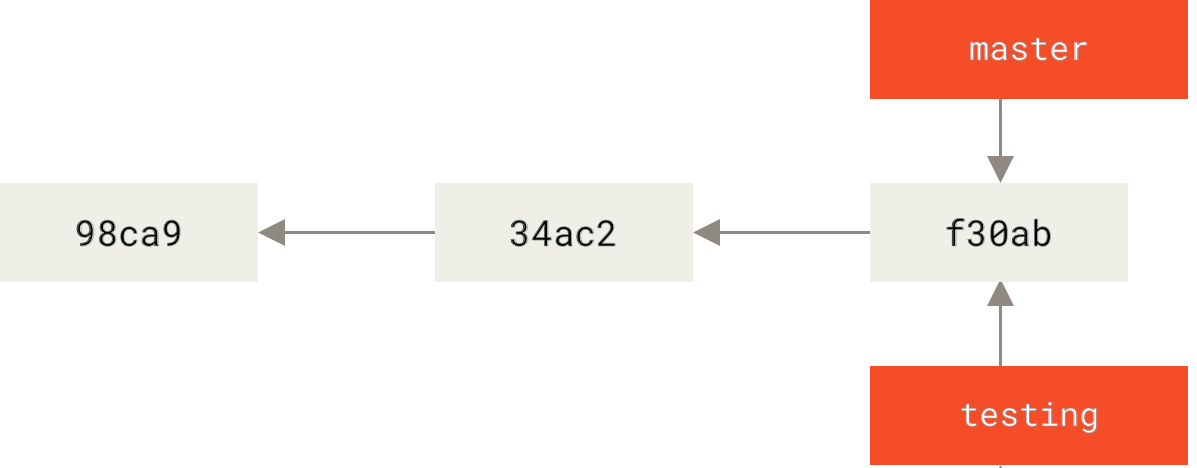
When you merge, Git chooses between a fast‑forward and a 3‑way merge depending on the history.
-
Fast‑forward merge happens when the target branch (
main) has no new commits since the feature branch diverged. Git simply moves themainpointer forward.git checkout main git merge feature-branch
-
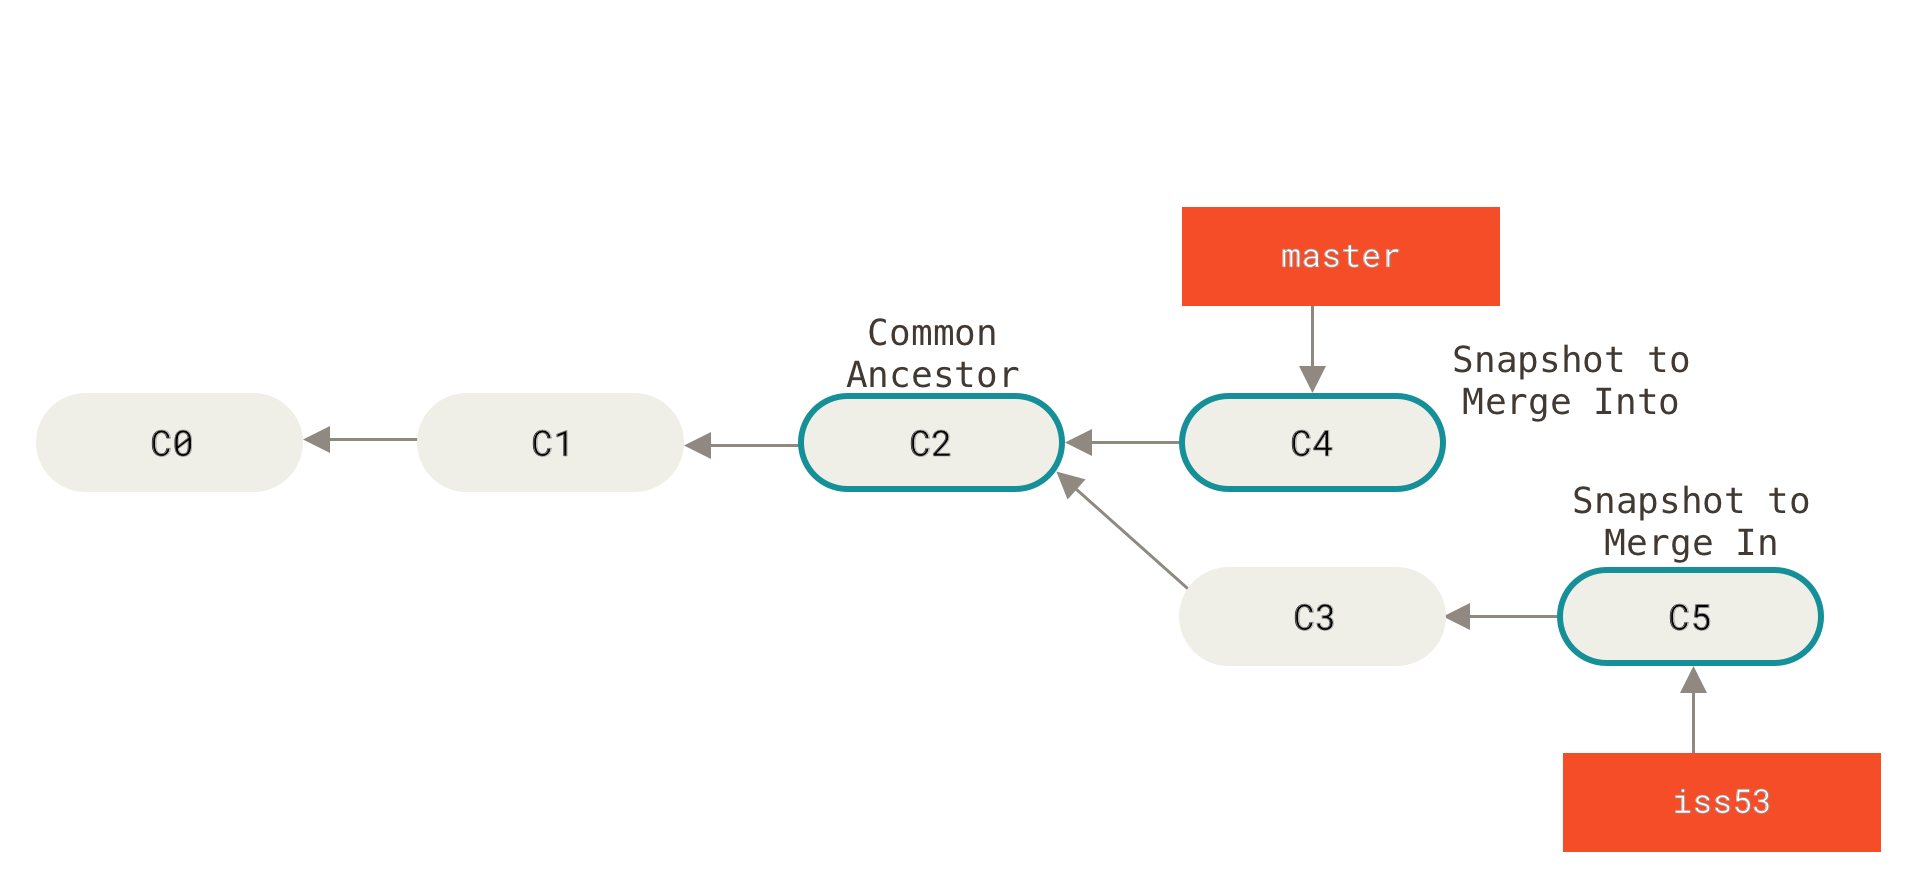
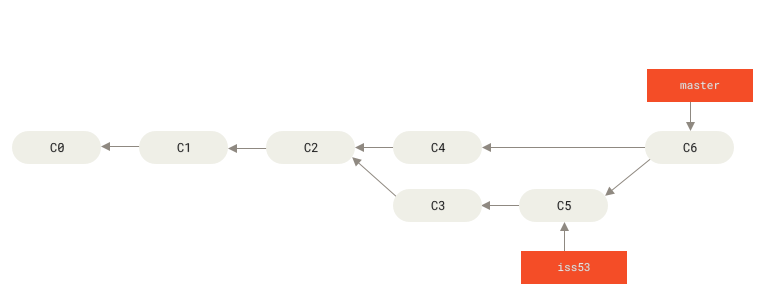
3‑way merge is performed when both branches have diverged. Git uses two branch tips and their common ancestor to create a new merge commit.
git checkout main git merge feature-branch # results in a merge commitYou can enforce a merge commit (even if fast‑forward is possible) with:
git merge --no-ff feature-branch
Conflicts occur when the same part of a file is modified in both branches. Git marks the conflicting area:
<<<<<<< HEAD
main branch version
=======
feature branch version
>>>>>>> feature-branch
To resolve:
- Edit the file, choose the correct version (or combine both), and remove the conflict markers.
- Stage the resolved file:
git add conflicted-file.txt
- Complete the merge:
git commit
- If you want to abort the merge:
git merge --abort
GitHub extends Git with powerful collaboration tools:
- Forking a repository to create your own copy.
- Pull Requests (PRs) – propose changes and review code.
- Issues – track bugs and feature requests.
- GitHub Actions – automate CI/CD workflows.
The typical flow:
- Fork or clone a repository.
- Create a feature branch and commit your changes.
- Push the branch to GitHub.
- Open a Pull Request against the original repository’s
mainbranch. - Discuss, review, and eventually merge.

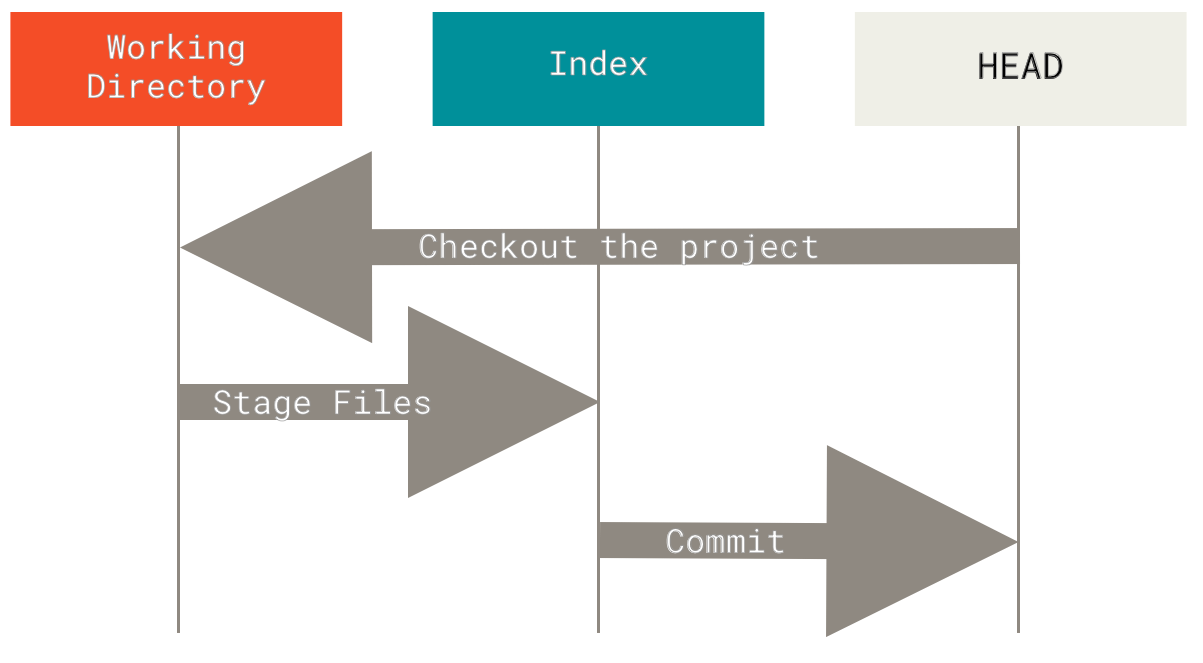
git reset --soft <commit>: moves HEAD, keeps staging and working directory.git reset --mixed <commit>(default): moves HEAD, resets staging area, keeps working directory.git reset --hard <commit>: moves HEAD, resets staging and working directory – destructive.
Creates a new commit that undoes the changes of a previous one, preserving history.
git revert <commit-hash>Unlike merge, rebase rewrites history to create a linear sequence.
git checkout feature
git rebase main
This replays the feature branch commits on top of the latest main, resulting in a clean, straight history. Never rebase commits that have already been pushed to a shared repository unless you’re sure no one else is using them.

Stashing temporarily shelves modifications, letting you switch contexts without committing half‑done work.
- Save changes:
Or give it a descriptive message:
git stash
git stash push -m "WIP: new login module" - List stashes:
git stash list
- Re‑apply the latest stash (keeps the stash):
git stash apply
- Apply and remove the stash from the list:
git stash pop
- Clear all stashes:
git stash clear
(Illustrated in the Stashing and Cleaning chapter of the Pro Git book.)
Git can automatically convert line endings between Windows (CRLF) and Unix (LF). The core.autocrlf setting controls this:
# On Windows – convert CRLF to LF on commit, LF to CRLF on checkout
git config --global core.autocrlf true

# On macOS / Linux – convert CRLF to LF on commit, do not convert on checkout
git config --global core.autocrlf input

# Disable automatic conversion (raw line endings)
git config --global core.autocrlf false
Recommended setup:
- Windows:
git config --global core.autocrlf true - macOS / Linux:
git config --global core.autocrlf input
In a team, you often need to integrate upstream changes before pushing your own work. The classic cycle:
- Fetch the latest metadata from the remote without merging:
git fetch origin
- Merge the fetched changes into your local branch:
Or, as a shortcut, pull (fetch + merge):
git merge origin/main
git pull origin main
- Resolve conflicts if any, then commit.
- Push your updated branch:
git push origin main
A typical collaborative workflow:
git pull --rebaseto keep a linear history.- Create feature branches, push them, open pull requests.
- After PR approval, merge on GitHub.
- Sync your local
mainwithgit pull.

- Pro Git Book – the official, free Git book.
- Atlassian Git Tutorials – comprehensive guides with visual examples.
- GitHub Skills – interactive courses.
- Oh Shit, Git!?! – common mistakes and how to fix them.
Contributions are highly encouraged! If you spot errors, have suggestions for improvement, or want to add new sections, feel free to open a pull request.
This repository is distributed under the MIT License. You are free to use, modify, and distribute the content. Please review the license before using the materials for your own projects.
Happy coding and collaborating!
Disclaimer: This guide is intended for educational purposes. Always refer to the official documentation and additional resources for a comprehensive understanding and best practices.