git
Git is a fast and scalable Distributed Revision Control System. Developed in 2005 by Linus Torvalds for use with the Linux Kernel, Git has become the most widely used VCS in software development.
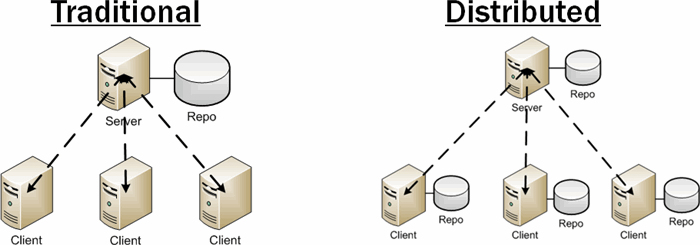
Revision Control Systems essentially keep a history of any and all work done on a project. Distributed Revision Control is the counterpart to traditional centralized revision control. In centralized revision control, there is a single code repository hosted on a server, clients checkout working copies of the code, edit it, and then update the server repo to the current version. In distributed systems, each client has a fully functional repository to work on, which can be merged with the server repository.
The benefits to Distributed Version Control include:
- No network required
- Faster operations
- Allows private work without having to publish
- Removes the risk of having the server be a single point of failure
- Still allows centralized control of the server "release" version of the project
Torvalds Google Talk on Git circa 2007
https://www.youtube.com/watch?v=4XpnKHJAok8
Well referenced wikipedia page on GIT
http://en.wikipedia.org/wiki/Git_%28software%29#cite_note-kernel_SCM_saga-6
#GET to know GIT
The following will cover the basics of using GIT via command line on any linux or unix machine. Please note there are many alternative ways for accomplishing these tasks, and many of these commands can be slightly edited to accomplish more specific goals.
##Initializing
To initialize a project or directory as a git repo, simply navigate to the directory and type the command
git init
That's it! This directory is now a working git repo
##Cloning
If instead of initializing your own git repo, you want to begin working on an existing one, simply navigate to the directory you want to host the repo, and type the command
git clone "repo address"
Where can be an HTTP web address like
git clone "https://github.com/CourseReps/ECEN489-Spring2015"
or an SSH server address like
git clone ssh://[email protected]/path/to/my-project.git
##Adding, Removing, and Committing
Git is used to keep a history of the repo. In order to do so, every time something in an initialized repo is changed at all, these changes must be saved to the repo history. This is done through commits. In the following example, a basic add, remove, and commit will be done.
Your new favorite git command should be
git status
This command will show you the current state of the repo, files to be added, and files staged for commit. It's good practice to use git status to verify your current state as you go.
Say we have 2 files in our repo (java1.java and java2.java) that we have edited, but we only want to save java1 to the repo history. We will do this in two different ways.
git add java1.java
git commit -m "committing java1 to history"
or using the '*' wildcard character
git *.java
git status
git rm java2.java
git commit -m "committing java1 to history"
Both result in the same outcome. This is the basic flow of committing changes.
##Reviewing History
The following command can be used to view the repo history.
git log
This will output the default format of the history, or
git log --oneline
This will output each commit as one line. Useful for getting a project overview
##Branching
Another important feature of git is Branching. Branching is essentially creating a separate line of development that can eventually be merged back into master branch. This should be used for adding new features or files to an existing repository.
To see available branches type
git branch
To create a new branch type
git branch newBranchName
To delete a branch (after merging) type
git brach -d branchToDelete
Once a branch is created, in order to work on that branch you must check it out. The following command essentially allows you to switch between existing branches.
git checkout existingBranchName
Once on a new branch, this is a common workflow
Do your editing
git add file
git commit -m "my commit"
Move back to main branch
git checkout master
And then merge
git merge existingBranchName
git branch -d existingBranchName
The following website provides a good amount of information on using git
https://www.atlassian.com/git/
Also, because git is so widely used, a google search will provide a plethora of tutorials and examples.
#GIT, GitHub, and IntelliJ
Three tools that are used extensively are git, GitHub, and IntelliJ. These three tools can be integrated together to improve productivity. Above you will find a git command line tutorial. Tutorials for GitHub and IntelliJ can be found in the Tutorials folder of this repo. The following tutorial will assume you are familiar with each tool individually, and will show you how to use the three mentioned tools together.
First, there are some basic git functions not yet covered. Namely Pull and Push.
##Pull and Push
Pull and Push are used to sync your local repository and remote repository together.
git pull
Actually performs the two operations:
git fetch git merge origin/'currentBranch'
The result is that the remote repository is connected to, the remote's copy of the current branch is fetched, and then the changes are merged into your local copy. This essentially updates your local copy with the remote repo changes.
Once you have your own local commits to add to a remote repository, push is used.
git push
This takes all your local commits on a branch and merges them to the remote repo. This command is safe in that it will not let you overwrite other peoples commits by stopping the push if it is not a fast-forward merge. If your push gets halted, the smart thing to do is to perform a pull, merge your changes locally, and then try pushing again.
##Integrating with IntelliJ
Because of the popularity of git and GitHub, IntelliJ actually comes packaged with built in tools for using them. IntelliJ provides a GUI for using git, which some might find less daunting or more convenient than the command line.
###Initializing a Git Repo
In order to initialize a local git repo on an existing project simply
Open the project
Go to VCS in the main menu
Select Enable Version Control Integration
A popup will appear
Select git from the drop down menu
Press OK
A message should appear at the bottom of the screen telling you where the git repo was successfully initialized.
###Cloning a GitHub Repo
If instead of initializing a new repo, you would rather clone one from GitHub, the following steps should be followed
Create a new project
Once the new Project is Open
Select VCS from the main menu
Select Checkout from Version Control
This will open the GitHub cloning pop up. (If the authorization is required, enter your info and then the Cloning window will open.)
Type in the github repo URL
Press Test to ensure the URL is correct
Select the directory you wish to clone into
Give the Directory a name (Usually the same as the repo)
Press Clone
You will be prompted to create a new IntelliJ project for the Clone
Select Yes
Go through the usual new project from existing sources steps, and presto! You have cloned the repo into an IntelliJ Project.
IntelliJ provides a View for performing git actions.
Select VCS From the main menu
Select Show Changes View
To perform the 'git add file' command in IntelliJ from the Show Changes View follow these steps
Locate the file in the Unversioned Files under the Local Tab
Right click the file Go to Add to VCS
The file is now staged for commit
To perform the 'git commit' command in IntelliJ from the Show Changes View
Select the green upward arrow with the VCS label on the left
This will open the Commit Changes PopUp
Review your changes Write a commit message Press Commit
Note, if your local repo is linked to a remote repo already, you can select to push your commit at the same time.
To Pull from a GitHub Repo in IntelliJ is simple
Select VCS from the Main Menu
Select Git Select Pull
This opens the pull changes window, for basic pulls these options can be left default
Press Pull
The pull will update your local copy of the repo! Note that the View may be changed, so the Show Changes View might have to be opened again.
To push to a GitHub Repo is as easy as pulling in IntelliJ.
Select VCS from the Main Menu Select Git Select Push
This will open the Push Commits PopUp displaying your commits to be pushed
Press Push
Your changes will be pushed to the remote repo!
IntelliJ provides many more in depth git related functions. The following link provides much more information
https://www.jetbrains.com/idea/help/using-git-integration.html